Introduction
My goal in this project was to build a traditional swivel-per-loop garland but with all metal moving parts. At no point does fabric wear against metal nor is the fabric of any loop interrupted by metal. I wanted a large loop garland that would make bubbles suitable for people to do bubble-in-bubble with. IMO, the maximum practical garland loop size is about 255 mm (10 inches) and my favorite material for good bubble stream duration is 3x braided Bed Bath & Beyond twine.
Materials
Treated and braided Bed Bath & Beyond cooking twine (8-strand)
Cotton household string
#28 Artistic Wire brand permanently colored wire
#6-#8 mercerized crochet cotton
This is my wick material. Its ends are bound with a bit of cotton household string to keep them from unraveling as I work.

3x braided BB&B cooking twine with ends bound
Tools
Scissors
Small wire cutters
Small pliers or hemostats
Hot glue and gun
Procedures
Joining the cord ends
Cut a 50 mm piece of wire.

Cut a 50 mm piece of wire
Feed the wire through a swivel. Note how the swivel is shaped like a bullet, with a pointed and a blunt end. Feed the wire through the ring of the blunt end. We'll be applying glue near this end and don't want it to get into the swiveling mechanism at the pointed end.

Feed the wire through a swivel
Bend the wire at its halfway point around the swivel.


Bend the wire in half through the swivel


Wire bent in half on the swivel
Place the wire and swivel on one of the braided ends, with the wire loop extending about 1 mm beyond that end. Note how the overhand knot of the braid binder string is on the opposite side. This makes the following steps a little easier.


Position the wire and swivel near one of the cord
Cut a piece of crochet cotton for the whipping. I used 60 cm (24") pieces. You might want to use longer ones until you have more practice.
Lay the whipping string across the wire about 12 mm (1/2") from the cord end.


Prepare for the 1st whipping
Tie an overhand knot on the opposite side of the cord from the wire and pull it tight.


Anchor knot for the 1st whipping, outside


Anchor knot for the 1st whipping, inside
Bend the wire ends over that whipping anchor and toward the cord end.


Bend the wire ends over the anchor


Wire bent over the anchor
Place the opposite end of the cord on top of the first. Make sure to follow the braid so there are no twists in it.

Place the wire between the cord ends
Bring the ends of the whipping string over the second cord and and tie an overhand knot. Make sure the 2 cord ends align as closely as possible before pulling that knot tight.


Bring the 2nd cord end into the whipping
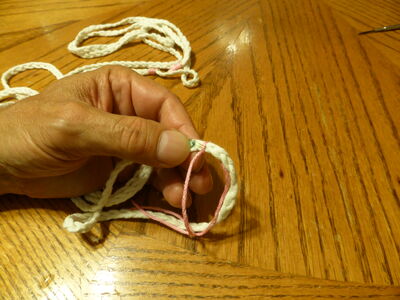
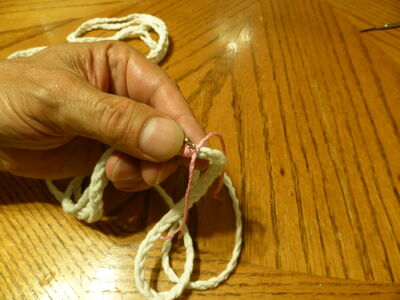
Note the directions that the string's ends exit from the knot. One will be angled toward the cord's ends. Form a loop with that end that reaches beyond the string's connector's loop.


Form the whipping's pull-through loop
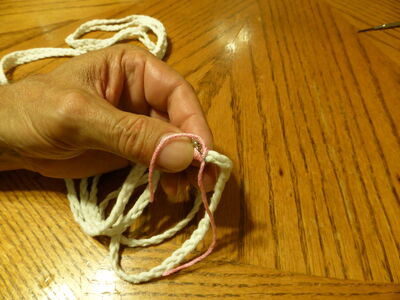
Grasp the cord's ends and that loop in one hand. The free end of the string will be angled away from the cord's ends and toward one side of the piece. Wrap that piece around the cord's ends, continuing in the direction that it exits from the knot. With each revolution around the cord's ends, wrap the string a little closer to the cord's ends, as pictured.


Grasp for start of whipping


Start the whipping


Continue 1st part of whipping
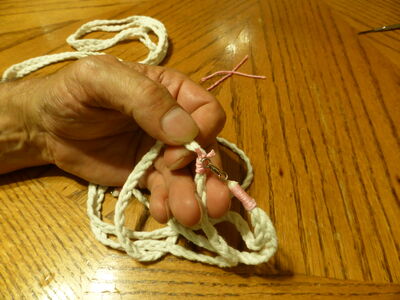
Before the wrappings reach the braid binder strings, get a new grasp that exposes the ends and the pull-through loop.


New grip for completing whipping
Pick off those binder strings with your fingers or any convenient tool.


Braid binder strings removed
Continue wrapping the connection until you are about 2 mm from the cord's ends, and at a point just below the loop you formed earlier. Hold the wrapping string at that point with a thumb and forefinger.


Prepare for whipping completion
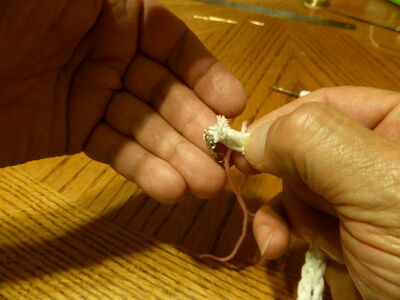
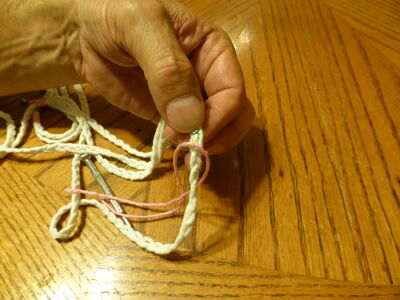
Pass the lead end of the whipping string through the loop. Be careful to keep the swivel itself from feeding through this loop.


Pass the whipping string's lead end through the loop
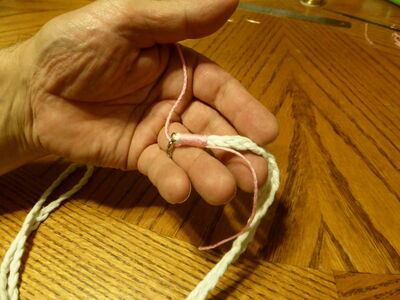
Find the other (tail) end of the wrapping string (in your palm) and pull on it until the loop closes, but not any farther.


Locate the whipping's tail


Pull the whipping's tail to close the loop on the lead end


Grasp the knot firmly at that point (where the loop has just closed on that string) and with your other hand, pull the lead end of the whipping string away from the knot and perpendicular to it, to take up any slack. Loosen your grip and rotate the knot as needed to allow slack to be taken in.


Take up slack in the lead end of the whipping


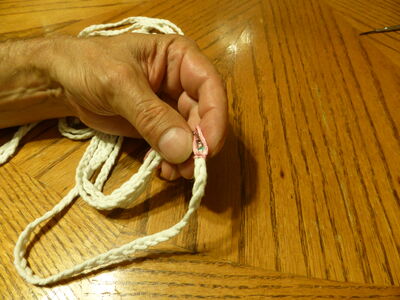
Grasp the entire whipping firmly and gradually pull on the whipping's tail end. You will be able to feel the end loop being pulled into the body of the knot. Stop pulling when the loop seems to have reached the center of the knot, or until it has passed beneath at least 3 windings. Trim the string ends.


Pull the end loop into the whipping's body

Finished whipping before trimming ends
Besides increasing the 'foreverness' of this connection, hot-gluing it adds other benefits. The glue is less absorbent than cotton so it reduces the potential for the bubble streams joining together.


Hot glue coat the cord end whipping
To finish the glue job, place a bead of glue around the exposed tips of the cords, wet your thumb and forefinger, and roll those tips into a sort of bullet shape. This helps to reduce hang-ups. Excess glue on the swivel's ring can be picked off with tweezers as needed.


Apply glue around the cord tips


Wet fingers for shaping glue


Roll the cord tips into a bullet shape while the glue is still warm.
The finished end connection. Repeat for every loop.


Finished end connection
Make the corner connections and build each garland half
This type of garland design requires an even number of loops. You build 2 half garlands and then join them together with each half's end connections pointing toward the poles' tips, and its corner connections pointing toward its center.
Mark the positions of each loop's corner connection. Make sure it's on the outer side of the loop's braid. See my Garland Loop Sizing Calculations article for tips on garland loop sizing.


Measure the corner's position


Marking a corner connection
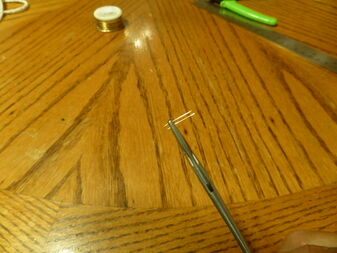
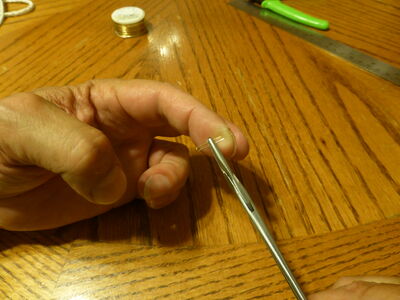
Cut a 30 mm (1 1/8") wire for the corner connection.


Cut wire for the corner connection
Bend the wire at its center, making a long narrow "U" shape. Precision helps at this point.


400x400pxx


400x400pxx


Bend about 2mm of the wire loop's tip upwards at a 90 degree angle.

Bend the tip of the wire up


Also bend wire tip ends up, at about 3-4 mm from their ends.

Bend wire tips' ends up


Corner wire shaped for whipping
Feed a cord end swivel through this corner connection wire.


Feed the wire through an and connection's swivel
Place the swivel's ring at the spot marked for the corner, with the corner wire's ends pointing toward the top-string (shorter section) and away from the bottom.


Position assembly for whipping
Cut a string for whipping and place it across the wire, near the bend by its ends.

Position string for whipping
Tie an overhand knot on the opposite side of the braid from the wire.


First corner know, inside of braid


First corner know, outside of braid
Bend the wire ends over that whipping anchor string and toward the wire's loop end.

Bend the wire over the string
Bring the whipping string's ends up over that bend and tie an overhand knot near but above the bend. Pull it tight.

Make a second overhand knot above the wire
Continue making overhand knots on alternating sides of the braid, working your way toward the wire's loop end. You're essentially making a modified West Country whipping for this connection.


Continue with a West Country whipping toward the wire's loop
When the whippings have reached the bend at the wire's loop end, make one more overhand knot past that wire loop on the braid's top, and finish the whipping with a square (reef) knot. (Make an overhand knot in the opposite direction of the previous one.)

Make one more knot beyond the loop end on the braid's top

Finish the whipping with a square knot
Trim the whipping's ends but not too closely. Leave some ears on it. With time, the ends will expand and "lock" the knot.


Trim string but not too close

Knot with ears
The finished connection will look like this.


Finished corner connection
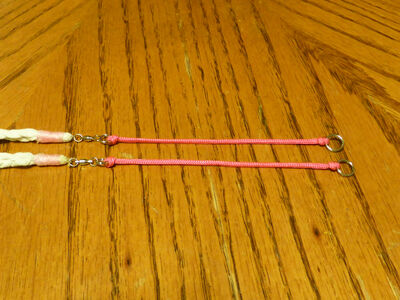
When you've finished the first half of the garland's loops, add one more corner connection and swivel its end loop, put that half aside, and make the corner connections for the second half. After that, the 2 halves are ready to connect.


The 2 garland halves, ready to connect
Connect the halves and add the leaders
Even with 2 swivels and a split ring separating the 2 halves, the bubble streams of the 2 innermost loops are likely to join. I used yet another swivel to increase the separation but you might also use a short length of strong fishing line.


Center connection

Leaders
Performance characteristics
Design advantages
An advantage to this design is that the loops lay relatively flat as you lift its 2 halves from the solution.


Loops lay flat on the lift
The wire corner "staples" keep the braid's top and bottom pointed in a favorable way as they exit the corner connection. Together with the bullet-shaped cord end joints, this reduces hang-ups.

The overall design avoids loop hangups
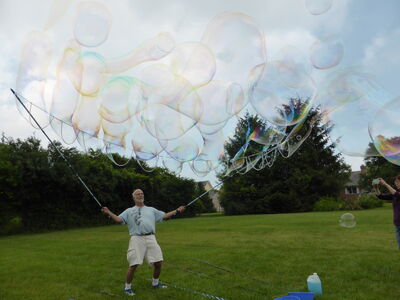
Being such large loops, it only takes a little wind or waving to push out a lot of big bubbles. It's great for times when there's little or no wind. Its only downsides are that it's rather heavy and uses a lot of solution.
Combating combined bubble streams
In an effort to minimize how often its bubble streams combined, I applied some hot glue to the outer surface of the braid near the corners. It worked but had 2 big disadvantages. Its loops no longer laid as flat on the lift. The wind had more of a chance to start producing bubbles prematurely. It also experienced more hang-ups. I had to use a hot iron and paper toweling to melt down and mop up as much of that glue as I could.


Combined bubble streams can also be minimized by using a minimal amount of polymer (PEO, HEC, guar, etc). Extra polymer is wasted on garlands anyway. See this Wiki's Recipe Pages for recommendations on polymer usage.